Understanding the basin’s fluctuating history provides a more complete picture of what factors may have affected early life in this region. Vital to this research is mapping, the ability to show features on the landscape and to mark areas of interest that can be relocated. Back in the 1970s when some of the first paleoanthropological expeditions began, navigating in the field was a much more difficult task. There were no roads, no GPS units, and inaccurate sketch maps. In order to locate where a fossil was found, researchers had to estimate on aerial photos. How was field research ever productive back then?
Today, we are very fortunate to have GPS units that can give us more precise coordinates of our location, making field work a much easier task. To stress this, the students first mapping assignment was to make observations of the TBI-Ileret campus and create a sketch map of the facility, without a GPS unit or any other tools. Below are photos of some of their initial sketches.

Sketch map of TBI- Ileret

Sketch map of TBI-Ileret

TBI-Ileret campus plan. Note differences in campus plan and sketches.
As expected, there was a wide variation in the maps created by each student. In order to minimize variability, Professor Martin had students redo the same task but this time with the help of a Brunton compass and pacing as a way to measure distances. Guest lecturer Dr. Daniel M. Davis introduced the students to these basic navigation skills in order to prepare them for the next step in their mapping assignment!
For Dr. Davis, a geophysicist and Geoscience Department Chair at Stony Brook University, teaching how to use a Brunton compass comes from many years of experience teaching Structural Geology. Therefore, he was the perfect guest lecturer to introduce the students to navigation and orienteering in the field!
Dr. Davis began class with an activity where he called out bearings and the students had to draw on the board what direction they would hypothetically travel from that point. Using the Jacob staff as a measuring guide, each student took a turn navigating the white board.

Natalie is the first to step up!
Afterwards, Dr. Davis brought the students out on the veranda where he discussed how to navigate using the Brunton compass. Initially, orienteering with a Brunton can be quite confusing. However, soon after Dr. Davis demonstrated to the students the methodology of Bruntons, almost everyone was a master navigator!

Dr. Davis explains the importance of a Brunton in the field and all of its applications

The students try using their Bruntons for the first time!

Morgan takes her bearing from the veranda

Millie and Tobias working together
Once familiar with this tool, the students were now ready to give their maps a second try! While at first this seems like an arduous task, these master navigators completed it with ease. In order to accurately map the compound, students had to first figure out how long their pacing stride was. This was done by counting how many paces it takes to walk 10m and then dividing that number by 10. This gave the students an approximate measurement of how long their stride was. After their pace was established, they had to then walk the perimeter and the distance between each building. Pacing is a great way to measure distances in the field in the most accurate and efficient way.

Max measures the classroom by counting how many paces it takes him to walk the length of it.

Natalie records the data collected

Kathryn taking her bearing before measuring her paces from the classroom to the dorms

The finished product! Compare this to the initial sketch and note how different it is when using no form of measuring/navigation tool.
Now that the students understood the basics of mapping an area, they were ready to conquer the field! Mapping the compound was a great introduction but creating an actual geological map can be a bit more complex. A geological map shows the different exposed rocks in an area which is critical for understanding how the sediments were deposited from the same period of time. This allows for many interpretations, most importantly what the past environment was like. For the students and even well-experienced field geologists, this is not an easy task! Due to erosion, faulting and periods of non-deposition, creating a geological map can become quite complicated. Below is an example of a geological map for the Ileret region.

Geologic Map from the Ileret Region from Gathogo & Brown 2006a
To keep it simple, the students were introduced to easily identifiable rock layers, belonging to the Koobi Fora Formation and the Galana Boi Formation, that are exposed throughout the Ileret region. The rock layers chosen for their assignment were the main fish bed in the Okote Member, the Chari tuff from the Chari Member, and lacustrine siltstones from the Galana Boi Formation.

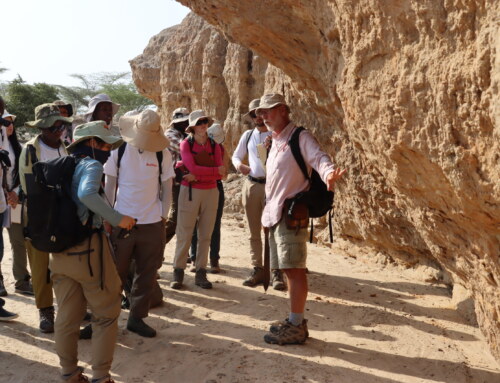
The students examine a local outcrop for the first time, trying to determine what they see in the stratigraphy

Jon analyzing the sedimentary structures preserved in the outcrop

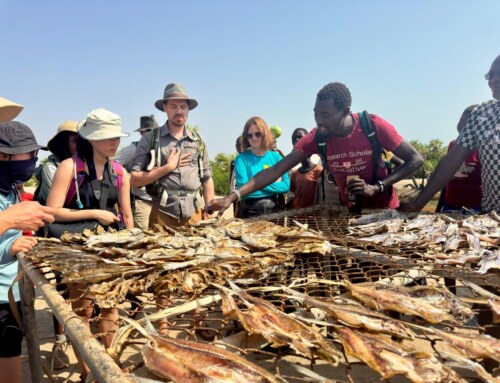
The students get up close and personal with the main fish bed

Professor Martin points out an important geological feature in the distance…what could it be???

It’s a fault line!! Follow the red layer and note how it discontinues to the left and a grey rock layer begins.
After the students familiarized themselves with the different marker beds, they split up into groups, were given GPS units and assigned one of the three marker beds to follow. Additionally, they were given a satellite image of the area that was generated through Google Earth. In order to create a geological map, the students had to first orient themselves by using the satellite images and then mark on those images where they located the marker beds. To make identifying these beds easier, the students had to think back to what they learned in sedimentology and stratigraphy. Knowing where a specific rock layer is stratigraphically is key when creating geological maps.
Below are stratigraphic sections for some of the marker beds the students mapped out.

Stratigraphic section representing the Chari member in the Ileret region. Note how large the Chari tuff is at the base of this section.

Stratigraphic section representing the upper part of the Okote member in the Ileret region. Note location of Main Fish Bed and what other rock layers border it.
The students had to follow the specific bed throughout the region, outline the bed on their satellite image, and mark their location with the GPS where ever they saw it. Once all of their coordinate points were collected, the students inputed their data into Google Earth. Below is the final integrated map of what the students found!

The students head out to start mapping their rock layers!

Example of one group’s final geological map on their satellite image. Pink shaded areas represent where they found the Galana Boi Formation.

GPS data from all students
One of the most useful lessons that the students will walk away from this module with will be on basic navigation and orienteering. While this is an important skill to have in order to pass the geology module, it is also a great skill to have in general. So far the students have learned how to navigate, orient themselves, create stratigraphic sections, and identify different sedimentological properties! What are these future geologists going to learn next??